
These would probably take several tries to get perfect looking, and I’m all out of the right noodles so that isn’t happening right now, but they’re VERY DELICIOUS so I’m going to share and we can all slowly perfect our japchae pancake making together over time!
 Ingredients:
Dough:
- 1 cup warm water
- 1 1/2 teaspoons instant dry yeast
- 2 tablespoons whole milk
- 2 1/2 tablespoons sugar
- 4 teaspoons neutral tasting oil (=veg, canola, etc.)
- 1 tablespoon unsalted butter, melted and cooled to room temp
- 2 1/2 cups (300 grams) bread flour
- 1/2 teaspoon fine sea salt
- additional oil for frying
Filling:
- 3 ounces dangmyeon noodles (Korean sweet potato noodles – Amazon has them if you don’t have a local Asian market)
- 1 tablespoon toasted sesame oil
- 1 1/2 tablespoons soy sauce
- 1 tablespoon oyster sauce
- 1 tablespoon sugar
- 1 tablespoon mirin (if you don’t have mirin, use rice vinegar and an extra pinch of sugar)
- 1 tablespoon vegetable oil
- 1/4 yellow onion, finely diced
- 1 ounce carrot, finely chopped (I just bought shredded carrots, I needed most of the bag for something else anyway)
- 1 ounce finely chopped chives
- 2 green onions finely sliced
- 1/4 teaspoon black pepper
To make the dough, combine the water, yeast, milk, and sugar in a small container and stir together. Set aside ~10 minutes until foamy, then add the oil and butter. (I only almost forgot the fats!)
Meanwhile, combine the flour and salt in a large bowl and whisk together.
 When the yeast mixture is ready, slowly pour it in while stirring with a rubber spatula, then keep stirring another 5 minutes until very smooth. Cover, and let rise ~45 minutes until doubled. (As usual, an oven with just the light on is a good, slightly toasty place for letting dough rise, as long as you don’t accidentally preheat the oven with your bowl still in it!)
 While the dough rises, prepare the filling. First, cook the noodles according to the package instructions. Remove them from the water when cooked, put in a medium bowl, and toss with the sesame oil.
Either while the noodles cook or after, make their sauce by combining the soy sauce, oyster sauce, sugar, and mirin in a small dish and stirring together.
Place a medium skillet over medium-low heat and heat the tablespoon of vegetable oil. Add the noodles and sauce and cook, stirring, until most of the liquid has evaporated.
 Transfer the sauced noodles back to their bowl. Cut the noodles into short pieces using kitchen shears. Add the onion, carrot, chives, green onion, and pepper, and stir to combine. At this point, you’ve made quite tasty japchae, and you’ve got enough to spare a few bites to try.
 When the dough is doubled, prepare your workspace.
 You’re going to be shaping little ball/blob/pancakes, and you’ll need a greased surface (like a plate/cookie sheet sprayed with baking spray) to put them on until they’re ready to go into the pan. You’ll also need a large nonstick skillet with enough oil in it to cover the bottom, heated to medium. Additionally, you’ll need cooling racks or paper towels for the cooked pancakes to wind up on. Finally, you’ll need a spatula!
Grease your hands and grab 2 – 2 1/2 ounce portions of the dough. Flatten it out into a circle in your hand and put 1 tablespoon of filling into the center. Gently draw the sides of the dough up to seal them together into one ball. This dough seemed way too gloopy for that to be possible at first glance, but it did end up working!
 Shape the filled balls of dough, then put 2-3 in the waiting skillet – you’re going to flatten them later, so even if it looks now like you have room for more, that may be risky! Cook for 2-3 minutes, until golden brown, then flip. Flatten, by pressing down with the spatula, until about 3/4″ thick, and cook an additional 2-3 minutes until golden on the other side. Remove cooked pancakes to your racks/paper towels, and repeat with the remaining balls.

 While eating these hot, straight from the stove is ideal, they actually held up well for several days. Leftovers are better if either toasted back up on the stove, or in a toaster oven.
Realistically, your kitchen is going to be a bit of a mess, but it’s totally worth it!
Japchae Hotteok
From Simply Korean.
Dough:
- 1 cup warm water
- 1 1/2 teaspoons instant dry yeast
- 2 tablespoons whole milk
- 2 1/2 tablespoons sugar
- 4 teaspoons neutral tasting oil (=veg, canola, etc.)
- 1 tablespoon unsalted butter, melted and cooled to room temp
- 2 1/2 cups (300 grams) bread flour
- 1/2 teaspoon fine sea salt
- additional oil for frying
Filling:
- 3 ounces dangmyeon noodles (Korean sweet potato noodles – Amazon has them if you don’t have a local Asian market)
- 1 tablespoon toasted sesame oil
- 1 1/2 tablespoons soy sauce
- 1 tablespoon oyster sauce
- 1 tablespoon sugar
- 1 tablespoon mirin (if you don’t have mirin, use rice vinegar and an extra pinch of sugar)
- 1 tablespoon vegetable oil
- 1/4 yellow onion, finely diced
- 1 ounce carrot, finely chopped
- 1 ounce finely chopped chives
- 2 green onions finely sliced
- 1/4 teaspoon black pepper
To make the dough, combine the water, yeast, milk, and sugar in a small container and stir together. Set aside ~10 minutes until foamy, then add the oil and butter.
Meanwhile, combine the flour and salt in a large bowl and whisk together. When the yeast mixture is ready, slowly pour it in while stirring with a rubber spatula, then keep stirring another 5 minutes until very smooth. Cover, and let rise ~45 minutes until doubled.
While the dough rises, prepare the filling. First, cook the noodles according to the package instructions. Remove them from the water when cooked, put in a medium bowl, and toss with the sesame oil.
Either while the noodles cook or after, make their sauce by combining the soy sauce, oyster sauce, sugar, and mirin in a small dish and stirring together.
Place a medium skillet over medium-low heat and heat the tablespoon of vegetable oil. Add the noodles and sauce and cook, stirring, until most of the liquid has evaporated. Transfer the sauced noodles back to their bowl. Cut the noodles into short pieces using kitchen shears. Add the onion, carrot, chives, green onion, and pepper, and stir to combine. At this point, you’ve made quite tasty japchae, and you’ve got enough to spare a few bites to try.
When the dough is doubled, prepare your workspace. You’re going to be shaping little ball/blob/pancakes, and you’ll need a greased surface (like a plate/cookie sheet sprayed with baking spray) to put them on until they’re ready to go into the pan. You’ll also need a large nonstick skillet with enough oil in it to cover the bottom, heated to medium. Additionally, you’ll need cooling racks or paper towels for the cooked pancakes to wind up on. Finally, you’ll need a spatula!
Grease your hands and grab 2 – 2 1/2 ounce portions of the dough. Flatten it out into a circle in your hand and put 1 tablespoon of filling into the center. Gently draw the sides of the dough up to seal them together into one ball.
Shape the filled balls of dough, then put 2 in the waiting skillet – you’re going to flatten them later, so even if it looks now like you have room for more, that may be risky! Cook for 2-3 minutes, until golden brown, then flip. Flatten, by pressing down with the spatula, until about 3/4″ thick, and cook an additional 2-3 minutes until golden on the other side. Remove cooked pancakes to your racks/paper towels, and repeat with the remaining balls.
While eating these hot, straight from the stove is ideal, they actually held up well for several days. Leftovers are better if either toasted back up on the stove, or in a toaster oven.

 For breakfast, spoon some of the rice mixture into a mug, leaving at least a half inch clear space at the top. Sprinkle the cheese over the rice mixture.
 In a small dish, beat together the egg, sugar, milk, and mayo with a fork.
 Pour over the cheese on the rice mixture. Some will run down into the rice, which is fine.
 Microwave 2 1/2-3 minutes (my microwave needs 2 1/2). While the dish cooks, if you want you can prepare the next day’s egg mixture, then cover and throw into the fridge.
 Once cooked, feel free to top/decorate with more ketchup. Grab a spoon and enjoy!
 Ingredients:
 Whisk in the eggs and vanilla as well. Add the flour, baking powder, and salt, whisking until combined.
 Gently fold in the Oreos.
 Transfer the dough into the prepared pan and spread evenly. Sprinkle whatever type of chocolate chip you like over the top, if desired.
 Bake for 30 minutes or until a toothpick inserted in the center (but not into a chocolate chip) comes out clean. Cool in the pan, then slice and serve.
 Spread a layer of lasagna noodles in the prepared dish. Top with half of the cheese/chicken mixture, then a layer of the pasta sauce.
 Add another layer of noodles, cheese, and sauce. Top with a final layer of noodles, some more sauce, and the remaining 1/2 cup each of the two shredded cheeses. Cover and throw in the fridge overnight.
 Place in a cold oven. Turn on to 400, and bake for 30 minutes (starting the timer without waiting for the oven to preheat). Slice and serve.
 Ingredients:
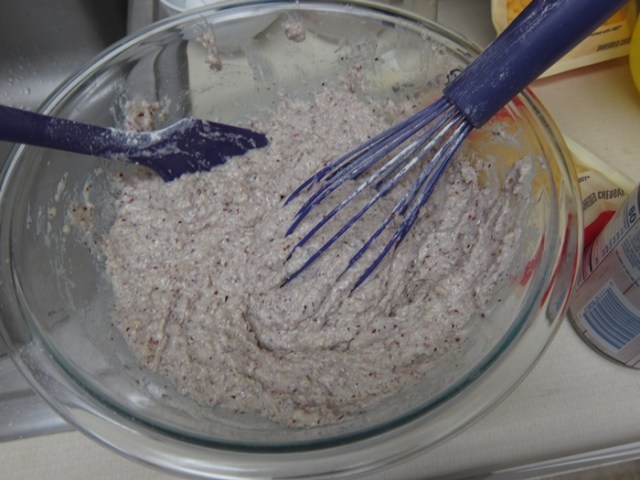
 Bake 15-18 minutes, or until just set. (I only own 9 and 12 inch skillets and went with the bigger one to avoid the risk of the ingredients overflowing a smaller pan – if you have to do the same, just check your cornbread at or before the shortest end of the timeframe to avoid burning.)
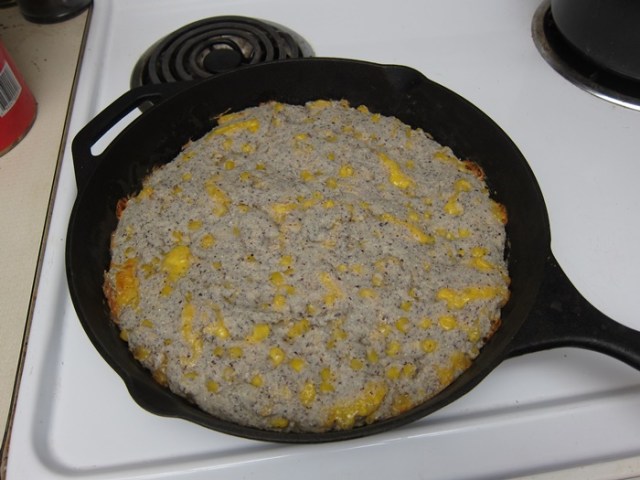
 Add all the remaining ingredients for the sauce and stir together, then bring to a simmer.
 Reduce the heat to low and cook at least 5 more minutes, or until the cornbread is ready.
 While the sauce cooks, stir together the chicken, green chiles, the remaining corn, and 2 ounces of the cheese.
 Stir another cup of the sauce into the chicken mixture.
 Spread the chicken mixture over the cornbread.
 Pour all the remaining sauce on top, then sprinkle the remaining cheese on top.
 Bake 25-30 minutes, until golden and bubbly. Remove from the oven and top with green onions and cilantro, and serve with lime wedges for sprinkling.
 Ingredients:
 Freeze according to your ice cream maker’s instructions.
 That’s it! Store in the freezer – it firms up some, but never gets as hard as ice cream.
 Filling:
 While the fruit bakes, combine the flour, sugars, baking powder, and salt of the topping in a large bowl and stir together. Blend in the butter with your fingertips or a pastry blender until the mixture resembles coarse meal.
 Stir in the water until just combined – this is enough water it’s not the dry pie crust texture I was sort of picturing.
 Set aside, then stir together the cinnamon sugar in a small dish.
 Bake until golden, 25-30 minutes.
 Serve still warm, ideally with vanilla ice cream.
 Ingredients:
 Use a rubber spatula to gently fold 12 ounces of the whipped topping into the pudding until completely mixed.
 Arrange a single layer of graham crackers in the bottom of a 9×13″ pan.
 Repeat grahams, pudding, curd. Top with a final layer of graham crackers, then spread the remaining whipped topping evenly on top.
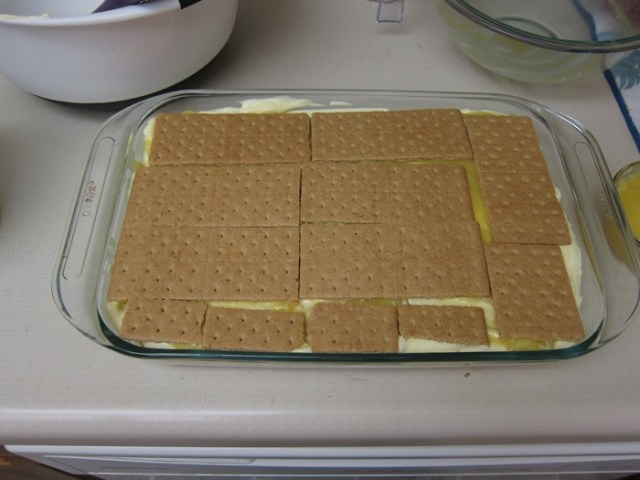
 Cover and refrigerate at least 8 hours before serving. The graham crackers will have become softened by the pudding, and will cut easily with a spatula/server. Top with berries, if desired, for serving.
 Add the dry goods to the wet and whisk gently.
 Gently turn the batter out into the prepared pan and spread evenly.
 Stir up the strawberry jam with a spoon so there are no huge chunks, then drop little dollops all over the batter. Swirl in using a knife or skewer.
 Arrange the strawberries on the top in rows, then sprinkle the remaining 2 tablespoons of sugar over the top.
 Bake 40-45 minutes, until the cake is golden brown and it passes the toothpick test. Cool in pan.

 Cut the room temperature butter into chunks and add to the dry goods mixture. beat together until the mixture becomes crumbly and resembles sand.
 Add half the liquid mixture and beat until just incorporated, then repeat with the remaining liquid.
 Pour into the prepared pan and bake 45 minutes, or until golden brown and a toothpick inserted in the center comes out with just a few moist crumbs. Set the baked cake, in the pan, on a rack to cool for 15 minutes while you make the glaze.

 Add the powdered sugar and stir. Sifting the powdered sugar first would definitely be a good idea!
 Let sit 15 minutes, then stir some more to hopefully mix in any lumps.
