
A fun, pretty easy dessert that’s something different than usual. It’s best the same evening it’s baked, but wasn’t nearly as soggy as I expected on the second day.
 Crust:
- 1 3/4 to 2 1/4 cups all-purpose flour
- 1 envelope pizza crust yeast
- 2 tablespoons sugar
- 3/4 teaspoon salt
- 2/3 cup very warm water
- 3 tablespoons corn oil (I used vegetable oil. Who has corn oil?)
Toppings:
- 2 Granny Smith apples, cored and thinly sliced (Fleischmann’s recommends peeling them, I didn’t bother)
- 1/3 cup brown sugar
- 2 tablespoons corn starch
- 1/2 teaspoon ground cinnamon
- 1 1/2 tablespoons butter, melted
- 1 1/2 tablespoons light corn syrup
- 1 teaspoon vanilla extract
- 1/4 cup chopped peanuts (I took this as optional)
Preheat your oven to 425 degrees. Line a baking sheet with parchment/a silpat or grease a pizza pan.
In a large bowl, combine 1 cup of the flour, the yeast, sugar, and salt, and stir briefly together. Add the water and oil and mix until combined.
 Add enough of the remaining flour to make a soft dough – I used about 1 3/4 total. Knead until smooth and elastic, then move to your prepared pan and pat or roll into a 12″ circle, pinching a rim around the outside to create a crust. Use a fork to dock (stab) the dough every inch or so.
 Place the apple in concentric circles on the prepared crust.
 In a small bowl, mix together the brown sugar, corn starch, and cinnamon until no sugar clumps remain.
 Stir in the butter, corn syrup, and vanilla until evenly mixed, then drop in small dollops over the apples. The mixture will melt and spread to fill the crust as it bakes, so if it’s not perfectly even that’s probably fine. Sprinkle with peanuts if desired.

 If using a pizza pan, place a larger pan underneath to catch drips. Place pan(s) in the oven and bake 16-21 minutes, until the crust is golden and the apples are tender. Let rest at room temperature 10 minutes before transferring to a cutting board to slice.

Caramel Apple Pizza
From Bread World.
Crust:
- 1 3/4 to 2 1/4 cups all-purpose flour
- 1 envelope pizza crust yeast
- 2 tablespoons sugar
- 3/4 teaspoon salt
- 2/3 cup very warm water
- 3 tablespoons corn oil
Toppings:
- 2 Granny Smith apples, cored and thinly sliced
- 1/3 cup brown sugar
- 2 tablespoons corn starch
- 1/2 teaspoon ground cinnamon
- 1 1/2 tablespoons butter, melted
- 1 1/2 tablespoons light corn syrup
- 1 teaspoon vanilla extract
- 1/4 cup chopped peanuts (optional)
Preheat your oven to 425 degrees. Line a baking sheet with parchment/a silpat or grease a pizza pan.
In a large bowl, combine 1 cup of the flour, the yeast, sugar, and salt, and stir briefly together. Add the water and oil and mix until combined. Add enough of the remaining flour to make a soft dough – I used about 1 3/4 total. Knead until smooth and elastic, then move to your prepared pan and pat or roll into a 12″ circle, pinching a rim around the outside to create a crust. Use a fork to dock the dough every inch or so.
Place the apple in concentric circles on the prepared crust. In a small bowl, mix together the brown sugar, corn starch, and cinnamon until no sugar clumps remain. Stir in the butter, corn syrup, and vanilla until evenly mixed, then drop in small dollops over the apples. The mixture will melt and spread to fill the crust as it bakes, so if it’s not perfectly even that’s probably fine. Sprinkle with peanuts if desired.
If using a pizza pan, place a larger pan underneath to catch drips. Place pan(s) in the oven and bake 16-21 minutes, until the crust is golden and the apples are tender. Let rest at room temperature 10 minutes before transferring to a cutting board to slice.
 Ingredients:
 Combine remaining crust ingredients and pulse until mixed.
 Pour into the springform and press evenly into the bottom and a bit up the sides.
 Bake 10 minutes, until lightly golden, then remove from the oven.
 Wipe out the food processor with a paper towel, then add the cream cheese and peanut butter and process until mixed.
 Add the sugar, egg, cream, and salt and process until smooth.
 Add the Butterfingers and process an additional 20 seconds, until chopped and spread through the batter.
 Turn the mixture out into the baked crust.
 Bake for one hour, then turn the oven off and crack the oven door open (wedging it with an oven mitt or wooden spoon if necessary to keep it open) and let the cheesecake sit an additional 2 hours.
 Refrigerate overnight, then serve topped with hot fudge sauce and chopped additional Butterfinger.


 Ingredients:
 Remove the crust from the oven and spoon several large spoonfuls of apricot preserves on it.
 As the heat of the crust begins to melt the preserves, spread them to thinly cover the whole crust except for a thin edge all the way around for later handling. Cover the apricot preserves with the grated cheese, then top with as much of the cooked chorizo as desired/as fits.
 Bake an additional 8-10 minutes.
 Slice, and enjoy!
 Ingredients:


 The next day, bring 2 1/2 cups of the remaining water to a boil. Place the 2 tablespoons of tea into a tea strainer or, as I had, empty tea bags. Put your tea strainer/bags into the boiling water, cover, and turn off the heat but leave the pot on the warm burner. Steep for 10 minutes.
 Meanwhile, in a small dish, combine the cold water and three packets of gelatin, stir together, and let sit 5 minutes.
 Gently remove the jello pigs from the mold, pushing from the top – I found they popped out quite easily even from an ungreased mold.
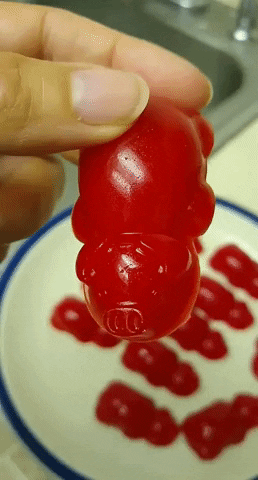 Place as many pigs as you’d like into an empty 9″ springform pan. Pour enough of the cacao tea gelatin in to act as a cozy mud bath for your pigs. Refrigerate until set, several hours.
 Once all the gelatin is set, remove the side from the pan. Gently peel the chocolate fences from the parchment and stab the bottom of each section into the gelatin around the outside, to create a fence. Holding the mint leaves in a tight bunch, cut thinly either with a knife or kitchen shears. Sprinkle the cut mint as desired to create patches of ‘grass’. Slice, and enjoy your wigglepigs!


 Pat the sliced steak dry using paper towel, then place the dried meat in a large ziploc. Add the cornstarch, seal, and shake well to coat evenly.
 Turn the coated meat out into the strainer you placed in the sink, shaking gently to remove excess cornstarch.
 Heat 1 1/2 teaspoons of the oil in a large wok or nonstick skillet over medium-high heat. Add the ginger and garlic, stirring constantly until fragrant, 15-30 seconds.
 Add the soy sauce mixture and cook for 2 minutes before transferring back to the bowl. The sauce won’t have thickened up yet, and that’s ok, we’ll come back to it!
 Turn the heat up to high and add the remaining 1 1/2 teaspoons of oil. Add the beef and cook until browned on all sides.
 Add the sauce back and cook until thickened to your desired consistency, which should happen within a few minutes.
 Turn off the heat and stir in the scallions. Serve with the prepared rice, and garnish with extra scallions if desired.
 Ingredients:
 Add the eggs one at a time, beating well after each addition.
 Add the vanilla and baking soda and beat again until well combined.
 Add the peanut butter and stir in by hand with a rubber spatula.
 Stir in the oats, then the chocolate chips, then turn out into the prepared pan.
 Spread the dough evenly, pressing it into a flat layer filling the whole pan.
 Sprinkle the Reese’s Pieces evenly over the top and gently press them into the dough.
 Bake 15-17 minutes, until lightly golden and no longer moist looking. Cool completely in the pan before cutting.

 Ingredients:
 Add the orzo, dry, to the dutch oven and cook, stirring occasionally, until lightly toasted, about 2 minutes.
 Add the wine/extra broth and use a wooden spoon to scrape up any browned bits of shallot from the bottom of the pan. Stir, slowly but constantly, until the wine has fully evaporated.
 Add a ladle-full of the simmering broth to the dutch oven and cook, stirring still slowly but constantly, until the broth has been fully absorbed into the orzo. Repeat, adding ladles-full every time the last one has been absorbed. Once half of the broth has been added, add the corn as well, and continue adding, stirring, and absorbing.
 Once all the broth has been absorbed, about 15 minutes total, remove the dutch oven from the heat and add the cheese, basil, and butter.
 Continue stirring until the butter has been melted and spread throughout, then taste and add additional salt and pepper if needed. Serve with additional Parm on each serving.


 Ingredients:
 Create a lattice top with your crust slices, laying strips in one direction, then folding every other one back about halfway to add a perpendicular strip, alternating which strips get folded back to create a woven-looking pattern. Fold over the outside edge and crimp.


 Ingredients:
 Drizzle additional honey over the prepared crust – you don’t want nearly as much honey as you would pizza sauce, as with too much honey the heat of the oven will cause it to melt, pour out onto the pan, and burn.
 Top with the chicken, then several large handfuls of shredded cheese. You want the cheese on top to keep the shredded, honey-coated chicken from burning.

 Slice and serve!
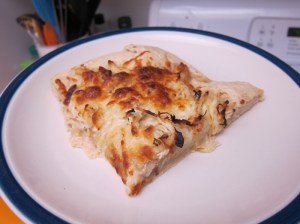
 Ingredients:
 In a large bowl, whisk together the flour, sugar, baking powder, baking soda, and cinnamon.
 Stir in 3 cups of the cucumber shreds, oil, and eggs until well mixed.
 Pour into the greased pan.
 Bake 1 hour, or until it passes the toothpick test. Let cool.
 When the cake has cooled to room temperature, use a mixer to beat together all the frosting ingredients until smooth. Spread over the top of the cake and enjoy!

