Spain!

So, I’m back from Spain! Thanks again to Jani, Guy, and Hillary for their guest posts while I was gone. I had never seen any of those before, but they all came out looking great! Solid work, friends.

My mother and I got back to the US Saturday night and went to bed without eating, and I spent all Sunday out with my father, so I’m afraid I haven’t cooked anything myself in almost 2 weeks?! That’ll be fixed by Wednesday, when I’ll either be sharing a fudgey cake or some ice cream – haven’t decided which to make first!

In the meantime, here are a few pictures from our trip to Bilbao, Spain:

IMG_7232

The flower dog statue outside Bilbao Guggenheim is sort of the thing that made me want to go to Bilbao in the first place. Reasonable?

Gluten-free's a thing everywhere, I guess!

Gluten-free’s a thing everywhere, I guess!

Bees!

Bees!

We took a funicular up a mountain in the north side of Bilbao.

We took a funicular up a mountain in the north side of Bilbao.

The view from where the funicular lets off.

The view from where the funicular lets off.

The Bullfighting Museum has posters from fights as long ago as 1895, and up to today.

The Bullfighting Museum has posters from fights as long ago as 1895, and up to today.

One of the better meals I've ever had.

One of the better meals I’ve ever had.

Neanderthal teeth, at the Bilbao Archaeology Museum!

Neanderthal teeth, at the Bilbao Archaeology Museum!

Grave marker at the same museum.

Grave marker at the same museum.

A statue depicting the running of the bulls, in Pamplona.

A statue depicting the running of the bulls, in Pamplona.

Tony Gallopin winning the San Sebastian Classic.

Tony Gallopin winning the San Sebastian Classic.

The winner "gets" to wear that hat?

The winner “gets” to wear that hat?

Some pintxos, which are SUPER common in Basque country. A wide variety of them are just out on the bar and you go up and pick a few to eat. The one on the right, with a soft cheese and tomato jelly (?) was the best one of the trip.

Some pintxos, which are SUPER common in Basque country. A wide variety of them are just out on the bar and you go up and pick a few to eat. The one on the right, with a soft cheese and tomato jelly (?) was the best one of the trip.

As trustworthy a palm-reader as I've ever seen.

As trustworthy a palm-reader as I’ve ever seen.

IMG_7684

Posted in Pictures | Tagged , , , , , | 1 Comment

Gougéres

A last while-I’m-out-of-the-country guest post, this one from Hillary, who got me to start blogging in the first place. Thanks once again, Hillary!

I think my parents started learning to cook in earnest in the mid-1980s, when they were broke and newly married college students. My mom liked baked goods, and my dad liked the French food he’d grown up on, but neither of them had any money to buy that sort of thing pre-made. And so they set to work with a few basic cookbooks and all the PBS cooking shows they could watch. My father was notorious for “babysitting” me while flipping back and forth between The Frugal Gourmet and He-Man.

This recipe for gougéres (pronounced “goo-ZHAIR”) comes from those days. I asked my mother if it came from Good Housekeeping and she snorted and said something along the lines of “Yeah, in 1983.” Like a lot of recipes from the ‘80s, it’s theoretically French. Also like a lot of recipes from that time, I’m not totally sure that a French person would recognize it. It has Cheddar, for one thing, and even though it’s supposed to be a variation on a choux pastry, I don’t think I’ve ever really seen these puff like choux should. (This is clearly the fault of the recipe, because Robin Eason can make an eclair rise like nobody’s business.) (Robin Eason is my mom.)

But here’s the thing: none of that matters. These are delicious and easy; they were Mom’s go-to whenever someone needed a baked good on short notice (this is probably why Corinne and I are friends, because she understands that this happens more often than you might expect). [eds. note: Yes. Very yes.] You almost definitely have all of the ingredients you need. Technically, yes, they’re best right out of the oven, but I promise you that you can eat them at room temperature or even cold and you’ll find them just fine. And they’re great as a portable snack – they travel well and have more protein than a straight carb snack like a roll. As a matter of fact, one of the reasons I chose to make these is because I have an early train tomorrow and I’m going to need breakfast. The other reason is that I didn’t have much time or the ingredients for anything else. The recipe may be from 1983, but some things never change.

So here’s how we do this:

Start by preparing half a package of your preferred bacon. You can fry it if you like, but I really cannot encourage you enough to try it in the oven – it’s a million times less messy and doesn’t make your kitchen smell like bacon for three days. I actually put some brown sugar on it to see if it would improve the gougére overall, but it wasn’t really noticeable, so I wouldn’t bother. If you choose to bake it, use a foil-covered pan and put the oven at 375 degrees or so. Start checking on it after ten minutes.

Please note that your preferred bacon is not turkey bacon. If you don’t have real bacon, use ham. If you don’t eat pork, leave it out.

IMG_6935
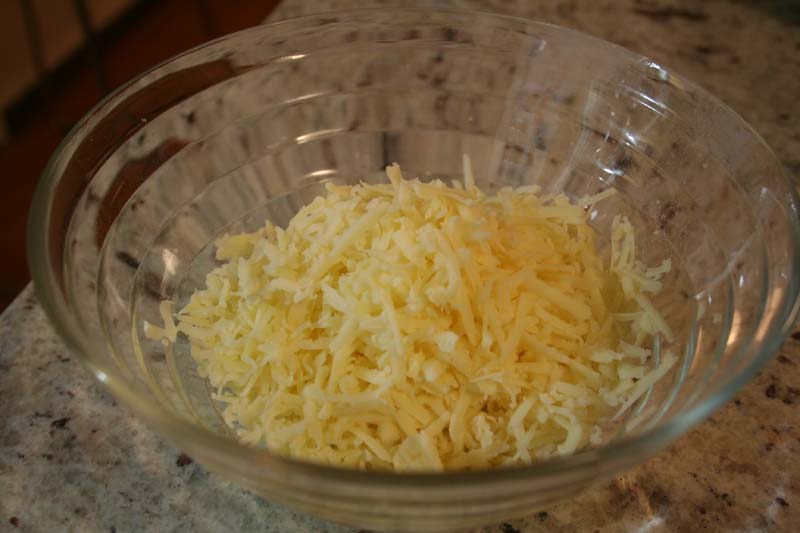
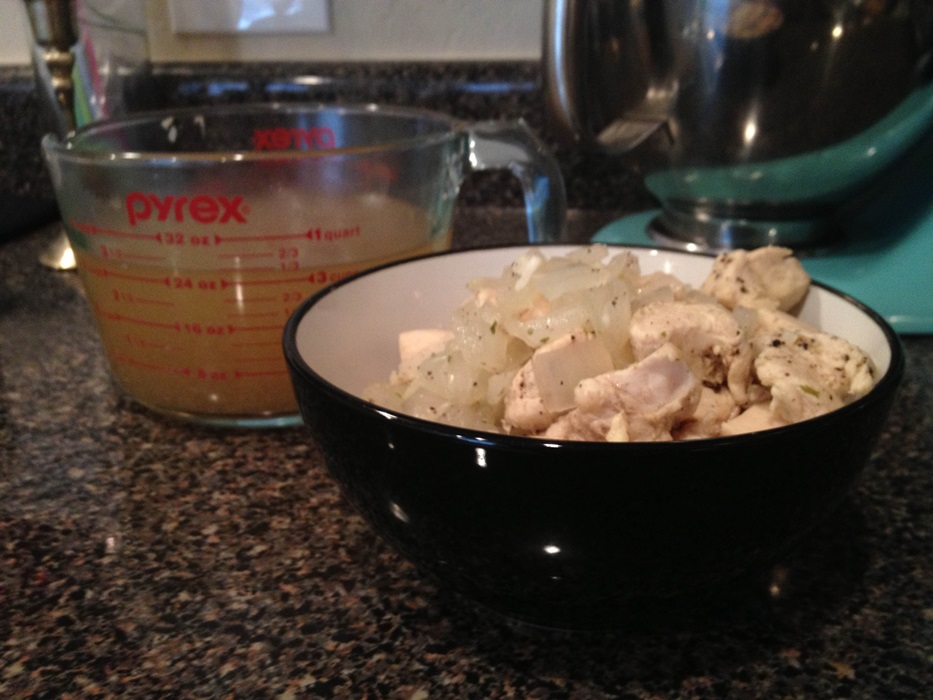
Next, grate about a cup of Cheddar – it’s not used for a few steps, but you’ll want to get everything put together pretty quickly, so it’s good to have it prepared. This is not the place for some sort of cloth-bound raw milk business, as it’s going to be mixed with a lot of other ingredients and the subtleties would be lost; however, you are using a lot of it, so this is also not the place for your taco shreds. A sharp or extra-sharp Cracker Barrel or Cabot would be perfect, and the former is what I used.

IMG_6958

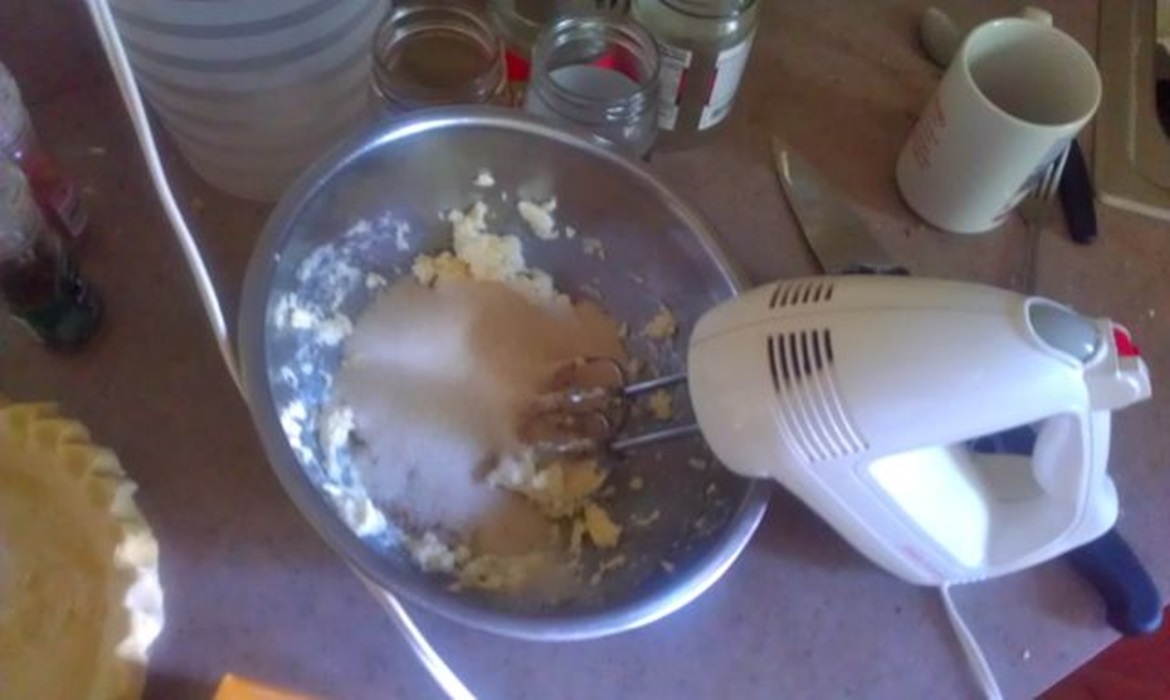
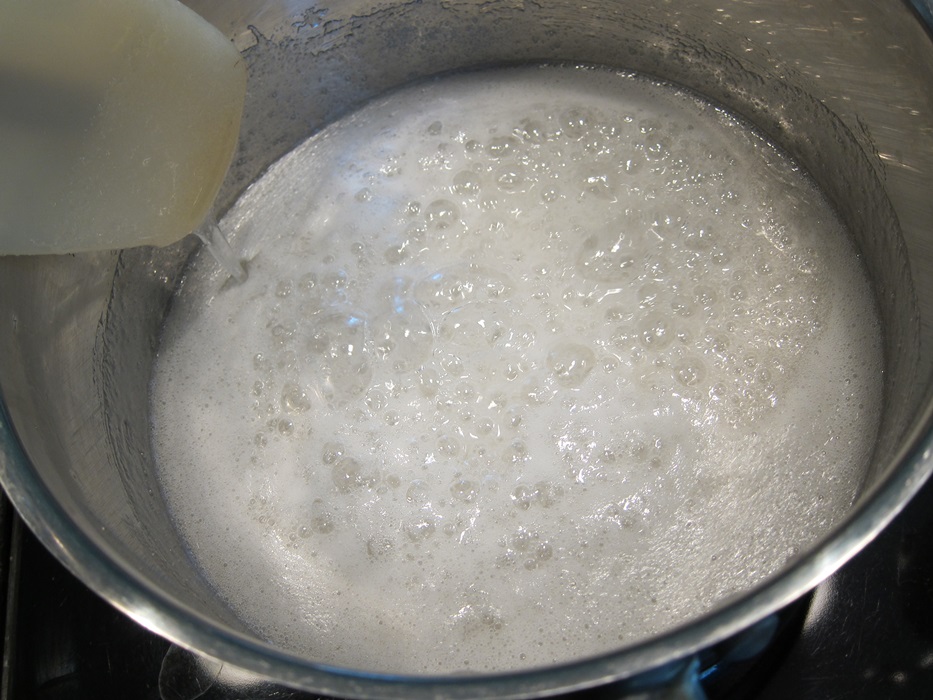
When the bacon’s in the oven and the cheese is shredded, combine a cup of water and a stick of salted butter in a pan and turn the heat to medium-high. Cook it until the butter is melted and the water has boiled – it won’t take too long.

IMG_6944

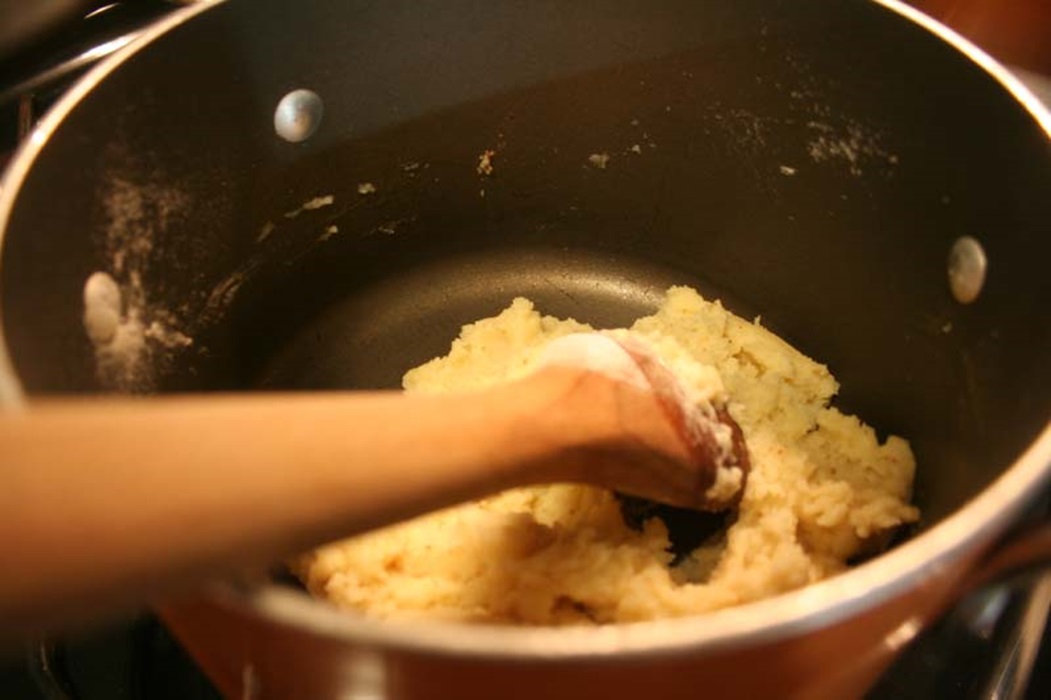
Once that’s melted, turn off the heat, let it cool for a minute, and then add 1¼ cup flour and ½ teaspoon dry mustard. If you don’t have dry mustard, you can substitute about a teaspoon of Dijon or brown mustard. (I can’t make any promises about yellow.) Stir it with a wooden spoon until the mixture forms a ball and leaves the sides of the pan – don’t use beaters for this, mostly because the liquid is still pretty hot. It’s hard to stir but doesn’t take long.

IMG_6949

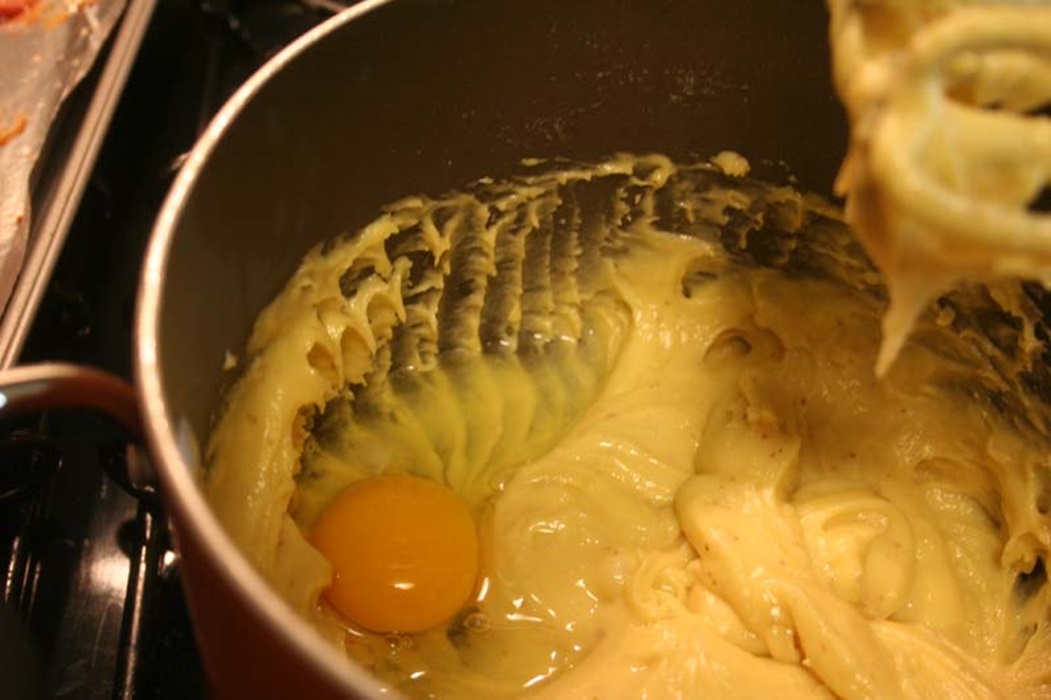
Now: add four eggs, one at a time. It’s okay to use an electric mixer at this point, and it’s probably easier. Do, however, make sure you do each egg individually, because the dough is too thick for multiple eggs to be integrated at the same time.

IMG_6954
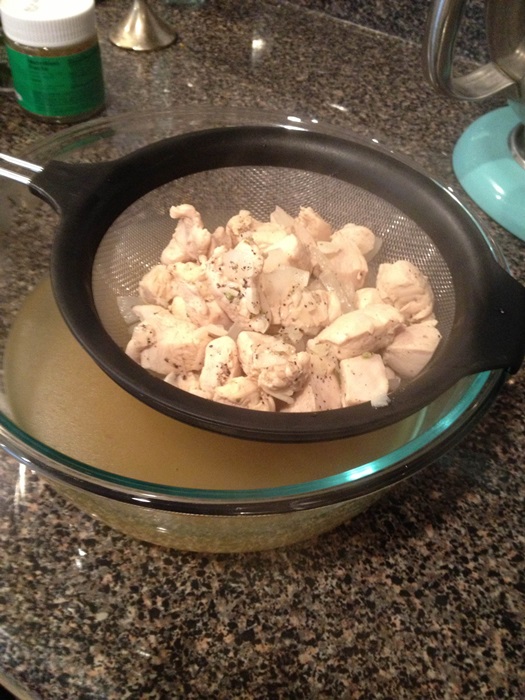
At this point, you have probably taken out the bacon:IMG_6959You’re going to want to add the cheese and the bacon (crumbled, obviously) into the batter. I generally use kitchen scissors to crumble bacon, and a lot of people have made fun of me for this, but I legitimately don’t understand why. It’s a lot faster and less messy.

IMG_6963

Mix it in – this is another place for the wooden spoon and not the beaters. The batter’s a lot wetter than it was in the dough stage. It’s probably wetter than it was if you’ve made choux before. This is okay.

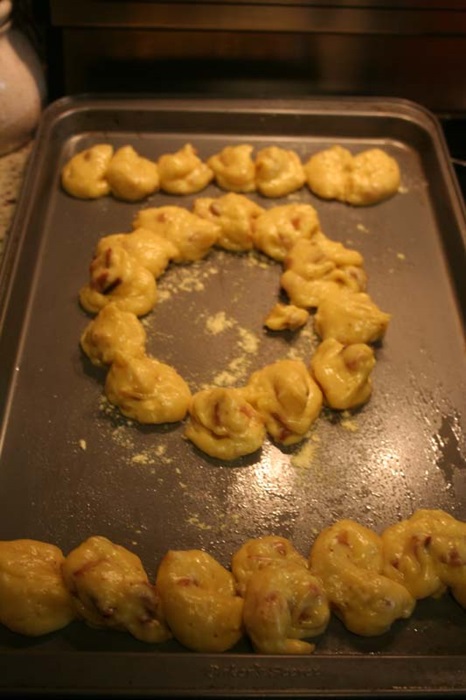
Once you’ve blended it all, you’ll spoon or pipe it onto a pan you’ve greased (you can use a Silpat, or spray oil + flour, but I used a little bit of spilled bacon grease and some cornmeal. My mom probably wants me to remind you that this is bad for you, but I will say that the bottoms turned out crispy and, quite frankly, perfect). I just filled a gallon Ziploc and cut off the corner to make a piping bag.

IMG_6966

IMG_6969
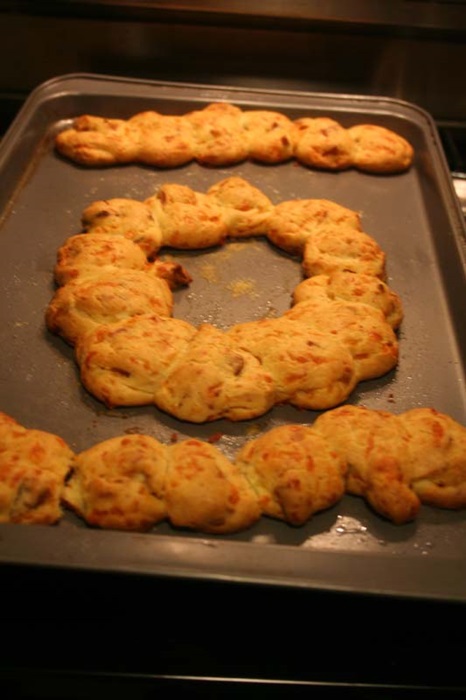
Mom always has them touch a little bit – I think maybe it helps them retain their structure, but I’m not sure. In my efforts to do this, I inadvertently made the Green Lantern symbol.

Even superheroes like gougéres, I bet.

Bake them at 375 degrees for 35 minutes, or until they turn golden brown. Do NOT open the oven door until you are pretty sure they’re close to done, or they might fall.


IMG_6971

Aren’t they beautiful?

GOUGÉRES ROBIN

Based on a Good Housekeeping recipe that has since been lost to time

Two notes:

1) The Internet is full of information about how to prevent your choux pastry from falling, with suggestions ranging from multiple oven temperatures to how to mix. Honestly, they might work here. I’ve just never bothered to try them.

2) You’ll notice that this recipe has no salt in it. Between the Cheddar, the bacon, and the salted butter, you don’t really need any (and I like salt). If you choose to go with unsalted butter, start by adding ¼ teaspoon of salt to the batter after the eggs and increasing to taste.

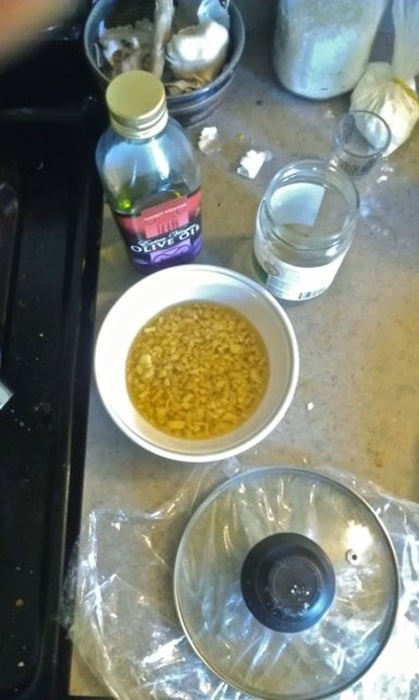
  • 1/2 8oz pack of bacon
  • 1 cup water
  • 1/2 cup (one stick) salted butter
  • 1 1/4 cups flour
  • 1/2 teaspoon dry mustard
  • 4 eggs
  • 4 oz sharp Cheddar cheese, shredded (about 1 cup)

 Preheat the oven to 375 degrees, and prepare a cookie sheet by greasing it and sprinkling cornmeal or flour (or use a Silpat). Fry or bake the bacon, drain, and crumble.  Shred the cheese.

Once these ingredients are prepared, heat water and butter in a two-quart pan until the butter melts and the water starts to boil.  With a wooden spoon, stir in flour and mustard all at once until the mixture forms a ball and leaves the sides of the pan.  Remove from heat.  Add eggs one at a time.  Beat well after each one (you can use a mixer for this).  Beat in cheese and bacon.  Drop in mounds in a circle on your cookie sheet.  Bake 35 minutes, or until golden.

Posted in Breakfast, Snack | Tagged , , , , | 2 Comments

Whiskey-Ginger Pie

Today’s guest post comes from my friend Guy, who has a pretty good grasp of how our food tastes overlap. Thanks, Guy! I may not want to eat it, but I will admit that is a nice looking pie.

Corinne and I agree on approximately 1% of the recipes we make, and usually those are the ones with kimchi in them. I’m pretty sure that a whiskey-ginger (grapefruit) pie is one of those things that would make her go “blechhh,” but for me it was maybe the perfect pie. Intensely gingery, a little bit too boozy, and with just a hint of grapefruit to add some surprise (because I couldn’t find any lemons in my house for some reason).

I made a peach-blueberry pie the day before, and did some questionable math in preparation that wound up with me having two extra piecrusts on hand. I did some Facebook surveying to try to figure out what kind of pie to make with them, and my friend Malissa suggested I finally try the ginger pie from Harold and Maude that we’ve both been dreaming about for years. Mal sent me this recipe.

IMAG0398The crust I had lying around was based on Smitten Kitchen’s all-butter pie crust recipe. It’s delicious and pretty simple, but feel free to use whatever recipe or store-bought piecrust you like.

I liked the sound of Matthew’s recipe, and it certainly sounds like he put a lot of effort into it. But there were a few kinks to work out. For starters, he wants you to soak the ginger in rum for an hour to prepare it for the pie, which seems crazy to me. Everyone knows that whiskey and ginger go really well together, so I made that substitution and don’t regret it a bit.

IMAG0396Matthew suggests using two and a half ounces of rum and a third of a cup of “young” ginger, but I have no idea what that means so I just used normal fresh ginger, and probably increased it to about a half cup for the sake of deliciousness. Also, I think I had an extra-big shot glass, so it turned into about four of whiskey. Nobody complained.

I let those sit for about six hours while I did more important things, then I came back and preheated the oven to 350F, set up my pie crust, and started mixing together the other ingredients. I creamed together a half cup of butter with a cup and a half of sugar.

IMAG0406Then I added three eggs.

IMAG0423Added 2 1/2 tablespoons all-purpose flour, a quarter cup of heavy cream, a couple teaspoons of vanilla extract, and a teaspoon of grapefruit zest because I couldn’t find a lemon. I’m not sure if it would have been better with lemon, but I liked the grapefruit flavor, a nice little bitter undertone.

re_9y1y3sOBuOjfCebvIlGz7X3X5I_s94tDUKK4oJHUThen I added the whiskey/ginger mixture and poured it all into the pan and baked it for fifty minutes.

IMAG0415Nothing went wrong! It came out totally pretty, like a pie that a real baker would bake! I’m used to crusts that fall off or burn to a crisp, so this was pretty exciting.

IMAG0429I dished this thing out at a potluck, and got a lot of positive feedback. The one surprising thing was how very boozy it was—no use trying to pretend that stuff cooked out because it was definitely a whiskey pie.

IMAG0434IMAG0435

Whiskey-Ginger (Grapefruit) Pie

  • 1 unbaked pie crust
  • 1/2 cup minced young ginger
  • 3.5 oz whiskey (I used Jameson, but any whiskey will probably be good)
  • 1 1/2 cups sugar
  • 8 tablespoons unsalted butter, room temperature
  • 1/4 teaspoon salt
  • 3 eggs
  • 2 1/2 tablespoons all-purpose flour
  • 1/4 cup heavy cream
  • 2 teaspoons vanilla extract
  • 1 teaspoon grapefruit zest

At least one hour before beginning, combine the ginger and whiskey in a small bowl or jar and set aside.

Cream the butter and sugar. Add eggs one at the time and mix after each addition. Add remaining ingredients, including the whiskey and ginger, and combine thoroughly.

Pour the mixture into the unbaked pie crust and bake at 350F about 50 minutes, until the center has mostly set, but is still just a little wobbly – it will firm on standing. It should have a slightly darkened, crusty top. If necessary, cover the pan with a tented piece of aluminum foil or an overturned stainless steel bowl to prevent overbrowning while the pie bakes.

Posted in Dessert | Tagged , , , | 1 Comment

Coxinha

The first of this week’s guest posts (while I’m on vacation) is from my friend Jani, who we’ve seen several times before on the blog. I quite approve of Jani’s writing style! I also like that she picked a food I’d never heard of before!

Corinne and I go way back, and have enjoyed cooking or baking together for quite a
while now. I’ve made cameo appearances in a couple of posts, but this is my first guest
entry – how exciting!

I was trying to decide what recipe would be worthy of such an honor, and decided on
one of my favorite (but incredibly high maintenance) snacks! Coxinha (pronounced koesheen-yah) is a Brazilian snack food found at most grab-and-eat type counters. They look like little chicken legs and are a perfect mix of fried, doughy deliciousness. Now, buckle up. These little snackaroos take about 2 hours to make, but the recipe yields a TON and they are just as good cooked after being frozen as they are brand new.

Ingredients:

  • 3 boneless chicken breast
  • 1/2 chopped onion
  • 2 chopped cloves of garlic
  • 6 tablespoon margarine
  • 2 cubes beef bouillon
  • salt
  • ground pepper
  • 3 cups all-purpose flour
  • 8 ounces cream cheese
  • 2 eggs
  • bread crumbs
  • oil for frying

The recipe calls for putting bouillon, chicken, onions, garlic, margarine, salt and pepper in a pressure cooker. If you don’t have one, you can get the same results by chopping the chicken into 2-inch cubes and cooking the ingredients on the stovetop for about a half hour. When the chicken is cooked through, you’re ready for the next step.

photoNext, separate the chicken/onions/garlic from the broth. DO NOT POUR THE BROTH DOWN THE DRAIN! You will need it later on in the recipe. I put a strainer into a bowl and carefully separate the chunky stuff from the liquid. You can reuse the pot you just emptied, just make sure you get all of the onions and pieces out before you transfer the broth back into it. Measure out 3 cups of the broth and set it aside – it’s time to mix up the chicken stuffing.
photo_1 photo_2Depending on the texture of chicken you prefer, you can finely chop up the meat or use a
fork to pull it apart. I’ve always used my teeny but trusty food processor – this way, the
onions, garlic and chicken all blend in together and will look sort of like tuna from a can
after it has been smooshed with a fork.

photo_3photo (2)I take a little detour from the original recipe at this point. Rather than waiting to add the
cream cheese, I have found the stuffing tastes better when it is folded into the chopped/pulled/tuna-like chicken.

photo_1 (2)To make the dough, bring the 3 cups of broth back up to a boil. Again, I detoured from
the recipe. Instead of mixing the 3 cups of flour into the pot and vigorously stirring the
mixture, I pre-measured the flour into my Kitchen Aid mixer armed with the dough
attachment. Once the broth boils, pour it slowly into the mixer while it is running on a
low setting, and turn up the power once all of the broth is poured in. BE CAREFUL –
don’t forget, the broth just came off of the stove. No touchy. Once the dough looks well
mixed, let it sit for a couple of minutes to cool down. It should be very sticky when you
touch it, but easy to make into a squishy ball if you lightly mold it.
photo_2 (2)You’re about half way done. Can you see why these are only a special treat? For this next
step, you’ll need cooking spray, a rolling pin and a cookie sheet lined with parchment
paper.

Spray your countertop with cooking spray and separate the dough into a workable amount, depending on the amount of space you have. Roll out the dough until it is between 1/4 and a 1/2 inch thick (too little, and the stuffing could fall out, but too much and they’ll be…well…doughy). Cut circles out of the dough depending on the size you want your coxinha to be. If you make your circles about 4 inches in diameter, place a tablespoon of the chicken stuffing into the center and smoosh the edges up and around the filling. Keep rolling it in your hand until you make it look like a little chicken drumstick and place it on the parchment lined cookie sheet.

photo_3 (2)photo (3)photo_1 (3)photo_2 (3)Repeat. Repeat. Repeat. Repeat. I ended up with a total of 27 coxinha. If you have extra
filling, I suggest you make yourself a little ‘chicken melt’ sandwich. I’m sure you’ve worked up an appetite by now.

Two more steps. I promise they’re worth it.

Separate 2 eggs, saving the whites in a bowl. In a second bowl, pour in some plain breadcrumbs. Dip each of the coxinha into the egg whites, then bread crumbs, coating
evenly and shaking off the extra crumbs.

photo_4photo_5If you’re planning on eating them all right away, you’re ready to fry them in vegetable
oil. If not, you can freeze the coxinha and fry them up when frozen – just give them a few
extra minutes. The coxinha should be golden brown on the outside when finished (about 4 minutes if they are room-temp ones, and about 6 minutes if frozen).

photo_6CHOW TIME – FINALLY! This crispy, crunchy, doughy, chicken-y goodness is a hit as
a party appetizer or a “its not meal o’clock” snack. Any condiments will do, but I prefer them with a spicy sauce.

photo_7 photo_8Thanks for having me on Spare Cake! I hope you enjoy this little taste of Brazil!

Coxinha

Lightly adapted from CookBrazil.com.

  • 3 boneless chicken breasts chopped into 2 inch cubes
  • 1/2 chopped onion
  • 2 chopped cloves of garlic
  • 6 tablespoon margarine
  • 2 cubes beef bouillon
  • salt
  • ground pepper
  • 3 cups all-purpose flour
  • 8 ounces cream cheese
  • 2 eggs
  • bread crumbs
  • oil for frying

Combine bouillon, chicken, onions, garlic, margarine, salt and pepper in a saucepan and cook on the stovetop for about a half hour, until chicken is cooked through.

Next, strain the chicken/onions/garlic from the broth, saving both parts. Measure out 3 cups of the broth and set it aside – it’s time to mix up the chicken stuffing.

Depending on the texture of chicken you prefer, you can finely chop up the meat, pull apart with a fork, or process in a food processor with the strained veggies. Fold in the cream cheese.

To make the dough, bring the 3 cups of broth back up to a boil. Place the flour into a mixer fitted with the dough hook, and slowly pour the boiling broth into the mixer while it is running on a low setting. Turn up the power once all of the broth is poured in. Once the dough looks well mixed, let it sit for a couple of minutes to cool down. It should be very sticky when you touch it, but easy to make into a squishy ball if you lightly mold it.

Set out cooking spray, a rolling pin and a cookie sheet lined with parchment paper. Spray your countertop with cooking spray and separate the dough into a workable amount, depending on the amount of space you have. Roll out the dough until it is between 1/4 and a 1/2 inch thick. Cut circles out of the dough depending on the size you want your coxinha to be. If you make your circles about 4 inches in diameter, place a tablespoon of the chicken stuffing into the center and smoosh the edges up and around the filling. Keep rolling it in your hand until you make it look like a little chicken drumstick and place it on the parchment lined cookie sheet. Repeat to use up remaining dough and filling.

Separate 2 eggs, saving the whites in a bowl. In a second bowl, pour in some plain breadcrumbs. Dip each of the coxinha into the egg whites, then bread crumbs, coating evenly and shaking off the extra crumbs.

If you’re planning on eating them all right away, you’re ready to fry them in vegetable oil. If not, you can freeze the coxinha and fry them up when frozen – just give them a few extra minutes. The coxinha should be golden brown on the outside when finished (about 4 minutes if they are room-temp ones, and about 6 minutes if frozen).

Posted in Dinner, Lunch, Snack | Tagged , , | 1 Comment

Peanut Butter Crunch Eclair Bars

First off, a note that I’m leaving (will have left by the time this is posted) for vacation in Spain with my mother, so next week there will be guest posts from several of my friends. Thanks in advance, friends!

And now! A hefty pan full of delicious! I’m into it! I accidentally made this in a 9X13″ pan, not a big jelly roll, so it’s thicker than it otherwise would be, but I feel like the pudding layer might be kind of thin if spread out over the wider pan?

IMG_6935Ingredients:

  • 1 cup sugar
  • 1 cup light corn syrup
  • 2 cups creamy peanut butter
  • 8 cups Frosted Flakes cereal
  • 1 1/4 cup butter, divided
  • 4 cups powdered sugar
  • 2 3.4 ounce packets of instant vanilla pudding
  • 1/4 cup milk
  • 2 cups semi-sweet chocolate chips

Line a 9×13″ or 15X10″ pan with foil and spray with cooking spray. We’ve still got that parchment/foil wrap, that I like a lot. Put the Frosted Flakes in a large bowl and set aside.

Combine the corn syrup and sugar in a medium saucepan over medium heat. Bring to a boil, and boil 1 minute, stirring occasionally.

IMG_6922Remove from the heat and stir in the peanut butter until evenly combined.

Starts off kind of gross and stringy looking, but eventually smooths out.

Starts off kind of gross and stringy looking, but eventually smooths out.

Stir the peanut butter mixture into the Frosted Flakes until coated, then turn out into the lined pan, spread evenly, and set aside. This is actually really super delicious as is, at this step. I ate more than I should have before moving on to the next step.

IMG_6924In a large saucepan, melt 3/4 cup of the butter over medium-low heat. Add the powdered sugar and pudding mix and. Whisk together, then gradually add the milk. I found that 1/4 cup milk left it too thick to spread well, so added another 1/4 cup and got a good texture.

milkSpread over the the cereal crust.

IMG_6927In a medium saucepan, melt the remaining 1/2 cup butter and the chocolate chips over low heat. Spread the melted mixture over the pudding layer.

IMG_6928Chill for at least one hour, then cut into bars.

IMG_6933

Peanut Butter Crunch Eclair Bars

From Cookies and Cups.

  • 1 cup sugar
  • 1 cup light corn syrup
  • 2 cups creamy peanut butter
  • 8 cups Frosted Flakes cereal
  • 1 1/4 cup butter, divided
  • 4 cups powdered sugar
  • 2 3.4 ounce packets of instant vanilla pudding
  • 1/4 – 1/2 cup milk
  • 2 cups semi-sweet chocolate chips

Line a 9×13″ or 15X10″ pan with foil and spray with cooking spray. Put the Frosted Flakes in a large bowl and set aside.

Combine the corn syrup and sugar in a medium saucepan over medium heat. Bring to a boil, and boil 1 minute, stirring occasionally. Remove from the heat and stir in the peanut butter until evenly combined.

Stir the peanut butter mixture into the Frosted Flakes until coated, then turn out into the lined pan, spread evenly, and set aside.

In a large saucepan, melt 3/4 cup of the butter over medium-low heat. Add the powdered sugar and pudding mix and. Whisk together, then gradually add the milk. Spread over the the cereal crust.

In a medium saucepan, melt the remaining 1/2 cup butter and the chocolate chips over low heat. Spread the melted mixture over the pudding layer.

Chill for at least one hour, then cut into bars.

Posted in Dessert | Tagged , , , | Leave a comment

Cheesy Kimchi Butter-Ranch Bread

So this is a recipe that sounds potentially gross, or at least highly smelly, but turns out to be really tasty. It comes out tasting somewhere between garlic bread, French bread pizza, and Korean food, which turns out to be a fine place to be.

IMG_6944Ingredients:

  • 4 tablespoons unsalted butter, room temperature
  • 4 tablespoons salted butter, room temperature
  • 1/2 cup kimchi
  • 2 teaspoons fish sauce
  • 1 teaspoon minced garlic
  • 1 loaf French or Italian bread, split in half lengthwise
  • 1 cup ranch dressing
  • 2 cups Italian shredded cheese mix
  • 1/8 cup fresh minced chives

Preheat your oven’s broiler and line a baking sheet with foil.

Combine the butters, kimchi, fish sauce, and garlic in a food processor. Don’t add too much of the liquid from the kimchi – some is fine, but a ton will make your bread soggy. Pulse until the ingredients are combined, scraping the sides at least once. For some reason, at this stage it really looked like there was quinoa in there, but…nope!

IMG_6938Turn the mixture out into a nonstick skillet and heat over low heat until the butter melts and the mixture is smoother.

Sometimes Jenn and I take 5 hours to eat at a Korean restaurant. Pretty ideal evening, really.

Sometimes Jenn and I take 5 hours to eat at a Korean restaurant. Pretty ideal evening, really.

Spread over the bread (cut sides up), then broil 2-3 minutes.

IMG_6940Remove from the oven and turn the oven to bake, at 350 degrees.

IMG_6941Combine the ranch dressing and cheese, and spread over the bread.

IMG_6943Bake for 20 minutes in the top 1/3 of the oven, until brown and bubbly.

IMG_6945Remove from the oven and sprinkle with chives before serving.

The chives are from the yard!

The chives are from the yard!

My friend Jenn and I both really enjoyed it! And happily, when it came out of the oven neither the kimchi nor the fish sauce odors were noticeable. Whew!

Yes. Good.

Yes. Good.

I’ll be submitting this to yeastspotting!

Cheesy Kimchi Butter-Ranch Bread

From Noble Pig.

  • 4 tablespoons unsalted butter, room temperature
  • 4 tablespoons salted butter, room temperature
  • 1/2 cup kimchi
  • 2 teaspoons fish sauce
  • 1 teaspoon minced garlic
  • 1 loaf French or Italian bread, split in half lengthwise
  • 1 cup ranch dressing
  • 2 cups Italian shredded cheese mix
  • 1/8 cup fresh minced chives

Preheat your oven’s broiler and line a baking sheet with foil.

Combine the butters, kimchi, fish sauce, and garlic in a food processor. Pulse until the ingredients are combined, scraping the sides at least once.

Turn the mixture out into a nonstick skillet and heat over low heat until the butter melts and the mixture is smoother. Spread over the bread, then broil 2-3 minutes. Remove from the oven and turn the oven to bake, at 350 degrees.

Combine the ranch dressing and cheese, and spread over the bread. Bake for 20 minutes in the top 1/3 of the oven, until brown and bubbly. Remove from the oven and sprinkle with chives before serving.

Posted in Dinner | Tagged , , | Leave a comment

Cherry Yogurt Bites

Once upon a time when I was a high school freshman, Greek yogurt hadn’t hit yet. It was so unknown, that someone in my Global Studies class was able to bring “Greek yogurt” as their contribution to an international food day. What they brought, however, was regular plain yogurt, with the addition of a ton of salt. Our teacher tried it and said it was good, so we all chugged it, and wow-oh-wow was that gross!

Based on its recent popularity, I’m pretty sure that that is not how Greek yogurt is made these days! (Actually, I think it’s just regular yogurt, strained to make it thicker?) The ‘real’ stuff can in fact be used to make some real tasty treats. This is a ridiculously simple recipe that you can make in a huge variety of flavors for a cool treat to help survive the summer.

IMG_6931Ingredients:

  • 1 1/2 cups vanilla Greek yogurt
  • 1 3 ounce package Jello, in this case cherry

Line a cupcake pan with 6-7 papers, or mini-cupcake pans with 12-16 papers. Stir together the yogurt and Jello powder thoroughly. This was a pretty amazing color in person. You can use any flavor jello that sounds good to you.

IMG_6929Microwave for 1 minute, stir, and microwave a second minute, to dissolve the Jello powder. Stir once more, then spoon into the lined pans.

IMG_6930Freeze for at least one hour, then enjoy!

IMG_6932Once frozen, you can pop these out of the tins and store them in a plastic bag. Top with whipped cream, if desired, although I like just eating the mini-cupcake sized ones in a few bites straight from the freezer, without any fiddling around in the fridge.

Cherry Yogurt Bites

From Cookies and Cups.

  • 1 1/2 cups vanilla Greek yogurt
  • 1 3 ounce package Jello of your preferred flavor

Line a cupcake pan with 6-7 papers, or mini-cupcake pans with 12-16 papers.

Stir together the yogurt and Jello powder thoroughly. Microwave for 1 minute, stir, and microwave a second minute. Stir once more, then spoon into the lined pans.

Freeze for at least one hour, then eat or store in a plastic bag.

Posted in Dessert | Tagged , , | Leave a comment

Risotto with Chicken and Caramelized Onion

A pretty fast dinner to throw together, if you have some leftover cooked chicken in the fridge (or a package of pre-cooked chicken strips in the freezer).

IMG_6886Ingredients:

  • 4 tablespoons olive oil, divided
  • 1 onion, chopped
  • 1/4 cup balsamic vinegar
  • 1 1/2 cups uncooked arborio rice
  • 1/4 cup dry white wine (couldn’t find any in the house, skipped it)
  • 7 cups hot chicken broth
  • 2 tablespoons butter
  • 2 cups chopped cooked chicken breast
  • salt and pepper to taste
  • 2 tablespoons chopped fresh thyme

Heat 2 tablespoons of the oil in a saucepan over medium heat. Add the onions and saute 15-20 minutes, until golden. During this time, bring the broth up to a low simmer.

Whoops, that's not a saucepan.

Whoops, that’s not a saucepan.

Remove the onions from the heat, stir in the balsamic vinegar, and set aside.

Heat the remaining 2 tablespoons of oil in a large skillet over medium heat. Stir in the rice, and let heat about 2 minutes. Pour in the wine and reduce the heat to medium low. Add the broth, about 1 cup at a time, letting each cup of broth absorb before you add the next, until all the broth has been added and absorbed, about 20 minutes.

IMG_6884Add the onion mixture and continue to cook until the onions are re-warmed. Remove from the heat and add the butter and chicken. Season with salt and pepper, and garnish with thyme. I thought it was a bit boring looking, visually, so added some carrot shreds and celery, for a bit more color.

IMG_6885Tasty, flavorful, and filling!

Risotto with Chicken and Caramelized Onion

From AllRecipes.

  • 4 tablespoons olive oil, divided
  • 1 onion, chopped
  • 1/4 cup balsamic vinegar
  • 1 1/2 cups uncooked arborio rice
  • 1/4 cup dry white wine (couldn’t find any in the house, skipped it)
  • 7 cups hot chicken broth
  • 2 tablespoons butter
  • 2 cups chopped cooked chicken breast
  • salt and pepper to taste
  • 2 tablespoons chopped fresh thyme
  • any vegetables, as desired

Heat 2 tablespoons of the oil in a saucepan over medium heat. Add the onions and saute 15-20 minutes, until golden. During this time, bring the broth up to a low simmer. Remove the browned onions from the heat, stir in the balsamic vinegar, and set aside.

Heat the remaining 2 tablespoons of oil in a large skillet over medium heat. Stir in the rice, and let heat about 2 minutes. Pour in the wine and reduce the heat to medium low. Add the broth, about 1 cup at a time, letting each cup of broth absorb before you add the next, until all the broth has been added and absorbed, about 20 minutes.

Add the onion mixture and continue to cook until the onions are re-warmed. Remove from the heat and add the butter, chicken, and any desired vegetables. Season with salt and pepper, and garnish each serving with thyme.

Posted in Dinner | Tagged | 2 Comments

Not Mac & Cheese

It’s been a while since I tried anything from the Wheat Belly Cookbook, mainly because so many of the recipes call for cauliflower, but finally it was time to stop avoiding it and give a cauliflower-heavy recipe a try. I already kinda knew cauliflower doesn’t have much taste, on its own, and it turns out when you pair that with cheese…it’s gonna work out alright.

IMG_6915Ingredients:

  • 5 tablespoons butter, divided
  • 1 small onion, minced
  • 1 clove garlic, minced
  • 2 tablespoons coconut flour
  • 1 13.6 ounce can coconut milk
  • 1/2 teaspoon dry mustard
  • 1/4 teaspoon sea salt
  • 2 cups shredded extra-sharp cheddar cheese
  • 1 large head cauliflower, in bite-sized pieces
  • 1/4 cup grated parmesan cheese
  • 2 tablespoons ground golden flaxseeds

Preheat oven to 350 degrees. Grease a 9X13″ dish. (The cookbook said 2 quart, but there’s no way this would have all fit!) Put the cauliflower in a large bowl.

In a medium saucepan over medium-high heat, melt 3 tablespoons of the butter. Add the onion and cook, stirring occasionally, until lightly browned.

IMG_6911Add the garlic and cook 1 minute, then add the coconut flour and cook, stirring constantly, until lightly browned.

IMG_6912Add the coconut milk, mustard, and salt, and bring to a boil, stirring constantly.

IMG_6913Remove from the heat and stir in the cheddar, then pour over the cauliflower and stir together well. Transfer to the greased dish. Cut the remaining 2 tablespoons of butter into small chunks and scatter with the parmesan and flaxseeds over the top of the dish.

IMG_6914Bake 30 minutes, or until bubbling and lightly browned.

IMG_6919My mother had apparently made it her entire life without ever eating cauliflower, so kind of picked and poked at it at first, even though she said it tasted good, but she ended up going back and adding some chicken and a few more veggies to the leftovers and voluntarily eating it the next day! Who would have ever believed.

Not Mac & Cheese

From the Wheat Belly Cookbook.

  • 5 tablespoons butter, divided
  • 1 small onion, minced
  • 1 clove garlic, minced
  • 2 tablespoons coconut flour
  • 1 13.6 ounce can coconut milk
  • 1/2 teaspoon dry mustard
  • 1/4 teaspoon sea salt
  • 2 cups shredded extra-sharp cheddar cheese
  • 1 large head cauliflower, in bite-sized pieces
  • 1/4 cup grated parmesan cheese
  • 2 tablespoons ground golden flaxseeds

Preheat oven to 350 degrees. Grease a 9X13″ dish. Put the cauliflower in a large bowl.

In a medium saucepan over medium-high heat, melt 3 tablespoons of the butter. Add the onion and cook, stirring occasionally, until lightly browned. Add the garlic and cook 1 minute, then add the coconut flour and cook, stirring constantly, until lightly browned. Add the coconut milk, mustard, and salt, and bring to a boil, stirring constantly. Remove from the heat and stir in the cheddar, then pour over the cauliflower and stir together well.

Transfer to the greased dish. Cut the remaining 2 tablespoons of butter into small chunks and scatter with the parmesan and flaxseeds over the top of the dish. Bake 30 minutes, or until bubbling and lightly browned.

Posted in Dinner | Tagged , , , | 1 Comment

Caramelized Peaches with Strawberry Sorbet

The Tour de France is going on this month, and as usual in the past year or two, tons of the teams’ chefs are on twitter, facebook, and various blogs. Seeing what the riders are having for dinner is always fun for me, and I was quite excited to find out that the chef for ORICA GreenEDGE (their capitalization, not mine!) was sharing a recipe a day on facebook. This is one of his desserts.

I really liked this, and I think you could serve it at anything from a cookout to a fairly fancy dinner. Certain factions in the house don’t believe that fruit-based items can be dessert, and are giant babies about eating peaches, but still admitted that the sorbet is excellent.

The recipe as written was kind of brief and doesn’t have a lot of guidance, so I’ll be writing it up as it worked for me. Because it’s from a non-US source, this recipe’s in metric measurements and requires a scale. It really is kind of worth having a scale around for more accurate measurements, and you can get pretty cheap ones on Amazon.

IMG_6909Ingredients:

Caramelized Peaches:

  • 4 peaches
  • 100 grams sugar
  • 1 vanilla pod (I used a small amount of vanilla paste)

Strawberry Sorbet:

  • 200g frozen strawberries
  • 1/2 liter water
  • 200 grams sugar
  • 2 grams gelatin
  • 1 lemon

To prepare the peaches, rinse and dry them, then cut into medium sized chunks, removing the pits.

Place the sugar in a pan, shaking the pan to spread the sugar fairly evenly. Place over medium low heat and cook until caramelized, shaking the pan occasionally to keep any one part from over-cooking. Keep a close eye on this, as sugar quickly goes from not-quite-ready to grossly burnt. Adding the peaches a few seconds early is greatly preferable to adding them to over-cooked sugar.

Nearly all melted, a few seconds more and you want to get your peaches in there!

Nearly all melted, a few seconds more and you want to get your peaches in there!

Add the peaches and seeds from the vanilla bean, and stir to coat. Reduce heat to low and let cook several minutes, stirring frequently. I found the peaches released quite a bit of liquid.

IMG_6904Remove from heat and let rest 1 hour.

To make the sorbet, combine the strawberries, water, and sugar in a pot. Bring to a boil over high heat, then reduce to medium heat and simmer, stirring occasionally, until the berries are very soft and most of their color has been leached out into the water. I was surprised how red the water got, and how grey-white the berries became.

These strawberries still have a bunch of color left to give!

These strawberries still have a bunch of color left to give!

Pour the mixture through a strainer into a bowl, squeezing the liquid out of the strawberries before discarding them. Add the gelatin powder into the still-hot liquid, and stir well for several minutes to ensure it dissolves. Add enough juice from the lemon, several drops at a time, that the mixture tastes bright and fresh. Set aside to cool to room temperature.

So red, so fruity!

So red, so fruity!

Freeze the liquid in your ice cream maker until firm.

IMG_6905Serve on top of the caramelized peaches, and drizzle with some of the excess liquid in the peaches, if desired.

I had to leave the cooked peaches sitting around for way longer than recommended, they were probably more vibrant looking earlier in the day... Still fantastic!

I had to leave the cooked peaches sitting around for way longer than recommended, they were probably more vibrant looking earlier in the day… Still fantastic!

Like I said, I thought this was great, and it’s gotta be way healthier than a lot of the stuff I normally eat for dessert!

Caramelized Peaches

From OGE’s Taste of the Tour facebook album.

Caramelized Peaches:

  • 4 peaches
  • 100 grams sugar
  • 1 vanilla pod

Strawberry Sorbet:

  • 200g frozen strawberries
  • 1/2 liter water
  • 200 grams sugar
  • 2 grams gelatin
  • 1 lemon

To prepare the peaches, rinse and dry them, then cut into medium sized chunks, removing the pits.

Place the sugar in a pan, shaking the pan to spread the sugar fairly evenly. Place over medium low heat and cook until caramelized, shaking the pan occasionally to keep any one part from over-cooking.

Add the peaches and seeds from the vanilla bean, and stir to coat. Reduce heat to low and let cook several minutes, stirring frequently. Remove from heat and let rest 1 hour.

To make the sorbet, combine the strawberries, water, and sugar in a pot. Bring to a boil over high heat, then reduce to medium heat and simmer, stirring occasionally, until the berries are very soft and most of their color has been leached out into the water.

Pour the mixture through a strainer into a bowl, squeezing the liquid out of the strawberries before discarding them. Add the gelatin powder into the still-hot liquid, and stir well for several minutes to ensure it dissolves. Add enough juice from the lemon, several drops at a time, that the mixture tastes bright and fresh. Set aside to cool to room temperature. Freeze the liquid in your ice cream maker until firm.

Serve sorbet on top of the caramelized peaches, and drizzle with some of the excess liquid in the peaches, if desired.

Posted in Dessert | Tagged , , , , | 5 Comments