
It’s been a while since my last post (in part because of this bread, which I had to make 3 times to get just right and in part because…I just ate melted chocolate from a ramekin for dessert for most of a month, when I wasn’t accidentally melting plastic spatulas into cakes??) but this bread is worth the wait! No knead, richly chocolate, good textured chocolate bread that is maybe not as sweet as you’re expecting (depending on the chocolate you use anyway) and makes the most amazing fluffernutters you’ve ever had. It would probably also be great with some sort of soft, spreadable cheese, if that’s your thing, but I’m moving soon and have to get through the remaining inch of my container of Fluff!

Fluffernutter about to get taken skiing.
It’s rare on this blog, but for this one I recommend breaking out the kitchen scale. I have provided conversions in cups for those of you without a scale, but the ounces for flour, cocoa powder, and brown sugar are going to be more accurate. The conversions were made using the Traditional Oven page‘s converter.

Ingredients:
- 14 ounces (3.18 cups) all-purpose flour
- 3/4 teaspoon instant yeast
- 1 1/2 ounces (0.36 cup) unsweetened cocoa powder
- 2 ounces (0.2 cup) brown sugar
- 1 1/2 teaspoons kosher salt
- 1 1/2 cups water
- 7 ounces chocolate (4 ounces semi-sweet and 3 ounces bittersweet is a good mixture, but you can tailor to your sweet tooth)
In a large bowl, whisk together the flour, yeast, cocoa, brown sugar, and salt, then pour in the water and stir until evenly mixed.
 Cover and let rest 12-18 hours (if you do this while dinner is cooking some evening, you can get the baking knocked out before work the next day – at least if you drag out your mornings like I do!)
 In the morning, place a cast iron dutch oven in your oven and preheat to 350 degrees, preheating at least 40 minutes, even if your oven beeps before that, so that the dutch oven gets sufficiently hot. Towards the end of that time, chop your chocolate and stir it into the dough, and place a piece of parchment paper on your counter.

For some reason I cut the chocolate smaller each time I baked this bread – that’s not necessary! These chunks are fine.
When the oven/dutch oven are preheated, with floured hands shape the dough into a ball, then place on the parchment. You can slash the top of the dough a few times if you’d like, although I’m not sure it made a huge difference here.
 Remove the dutch oven from the oven and uncover. Transfer the parchment paper with the dough on it into the dutch oven, recover, and return to the oven for 25 minutes.
 At that time, uncover and bake an additional approximately 10 minutes. If the bread sounds hollow when tapped on the bottom, it’s done baking. Cool on a wire rack before slicing.


Chocolate Bread
Adapted from It’s Not You, It’s Brie.
- 14 ounces (3.18 cups) all-purpose flour
- 3/4 teaspoon instant yeast
- 1 1/2 ounces (0.36 cup) unsweetened cocoa powder
- 2 ounces (0.2 cup) brown sugar
- 1 1/2 teaspoons kosher salt
- 1 1/2 cups water
- 7 ounces chocolate (4 ounces semi-sweet and 3 ounces bittersweet is a good mixture, but you can tailor to your sweet tooth)
In a large bowl, whisk together the flour, yeast, cocoa, brown sugar, and salt, then pour in the water and stir until evenly mixed. Cover and let rest 12-18 hours.
In the morning, place a cast iron dutch oven in your oven and preheat to 350 degrees, preheating at least 40 minutes. Towards the end of that time, chop your chocolate and stir it into the dough, and place a piece of parchment paper on your counter.
When the oven/dutch oven are preheated, with floured hands shape the dough into a ball, then place on the parchment. Remove the dutch oven from the oven and uncover. Transfer the parchment paper with the dough on it into the dutch oven, recover, and return to the oven for 25 minutes. Uncover and bake an additional approximately 10 minutes. If the bread sounds hollow when tapped on the bottom, it’s done baking. Cool on a wire rack.
 Ingredients:
 In a large bowl, beat together the butter and brown sugar until light and smooth.
 Add the dry goods mixture in 3 additions, alternating with 2 additions of the liquid mixture. It looks kind of gross after both times you add liquid, but goes back to a decent looking batter with the addition of more dry goods.
 Pour the batter into the greased bundt pan and spread with a spatula to even it out.
 Bake 35-40 minutes, until golden brown at the edges, and it passes the toothpick test.
 Cool in the pan for 15 minutes, at which point the cake should have slightly separated from the edges of the pan. If you see any parts where it’s still stuck, gently pry it off with a knife or small spatula. Invert on a dish or rack and cool completely, about another hour.
 When the cake is cool, whisk together the icing ingredients.
 Drizzle/pour the icing over the cake. Let set for 15 minutes prior to serving.

 Ingredients:
 Beat in the malted milk powder, then the egg.
 Add the flour mixture and beat on low until combined.
 Scoop the dough by teaspoonfuls onto the lined sheets.
 Bake 12-14 minutes, rotating from top to bottom and spinning the pans halfway around halfway through the baking time. Let cool a few minutes (3-5) on the pans, then transfer to wire racks to cool completely.
 Once the cookies are cool (which doesn’t take too long), beat together all the filling ingredients until smooth.
 Scoop into a piping bag (or sandwich baggie that you seal and then snip a corner off of) and pipe about 2 teaspoons’ worth onto half the cookies.
 Use the remaining cookies to create sandwiches, then let rest for about an hour for the filling to firm up before serving.

 Ingredients:
 Once everything is evenly mixed, pour it into the lined pan. Using a spatula, or your hand and another piece of wax paper/foil, press the mixture firmly to fill the bottom of the pan, creating a thin even layer.
 Cut into 12 even pieces, then freeze at least 1 hour.
 Wrap, and store in the freezer until ready to eat – they don’t need to thaw, but can be eaten straight from the freezer. If you used the non-stick foil, if you just stack the bars up, you can probably wrap them in that same foil. So thrifty!
 I have these after almost every workout these days, and I love them!

 Remove the cooked meat from the crockpot and shred with 2 forks, then return the meat to the crockpot and stir together with the liquid inside. Cook on high, with the lid off, until most of the liquid has been absorbed.
 Meanwhile, to make the polenta, first bring the stock to a boil in a medium saucepan. Whisk in the polenta and reduce the heat to medium-low, continuing to stir until the mixture thickens and is well combined.
 Reduce the heat further, to low, and cover. Cook, stirring occasionally, about 30 minutes, until the mixture is very soft, the liquid is all absorbed, and there are no more dry chunks. Stir in the butter, cheese, salt, and pepper, until the butter and cheese are melted in.
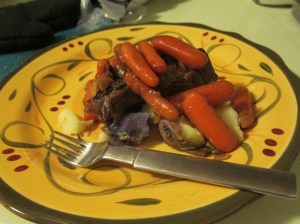
 Serve the pork over the polenta, topping with the optional toppings as desired.
 Ingredients:
 Lightly grease a 9″ pie plate, then set aside. Do not preheat the oven.
 Stir in the walnuts (or chocolate chips) until evenly mixed. You can knead a few times if desired, but it’s not necessary.
 Place the banana slices in the greased pie dish, creating one even layer over the bottom.
 Combine the cinnamon and sugar for the topping in a small dish, stirring together. Taking tablespoon-sized pieces of the dough, roll each into a ball, then roll in the cinnamon sugar to coat. Place the coated dough balls on top of the banana slices, and repeat until all the dough has been used up.
 Sprinkle the remaining cinnamon sugar over the dough balls. I sort of spaced it at this step and instead threw out the rest of the cinnamon sugar, so mine weren’t as sweet as they could have been, but they were still real tasty. Drizzle the butter over the dough, then sprinkle the chocolate chips evenly over the top.
 Let cool 10 minutes on a wire rack, then serve still warm. Refrigerate leftovers.
 Ingredients:
 Add the sugar and beat until smooth, then the coconut oil and vanilla.
 Add the flour mixture and beat until just blended.
 Stir in the oats and chocolate chips by hand. Cover, and chill the dough for about 1 hour, until it can be shaped into balls.
 Preheat oven to 350 degrees and line to baking sheets with parchment. Scoop the dough by the rounded tablespoon, pressing the dough firmly into a ball, then flattening the ball slightly. Place slightly spaced on the parchment lined sheets.
 Bake 10 minutes or until they appear set and a bit browned at the edges. Transfer the cooked cookies to a wire rack to cool completely.
 Ingredients:
 Beat in the eggs and vanilla.
 Stir the flour mixture into the butter mixture until well mixed.
 Gently transfer to the prepared bread pan.
 Bake 75-85 minutes, until crusty on top and a toothpick inserted in the center comes out clean. Cool in the pan for 10 minutes, then run a knife around the edges of the pan to loosen. Turn out on a wire rack to cool completely.

 Ingredients:
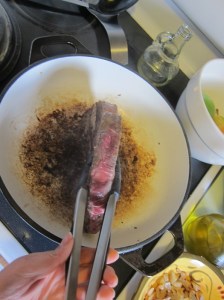
 Increase the heat to medium-high. Liberally salt and pepper all sides of the meat, then brown 3-5 minutes per side until browned all over.
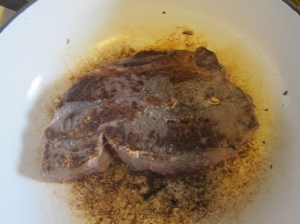
 Cover, and cook 2-3 hours – 2 1/2 will probably be about right, but check at 2 hours, both to see if the meat is tender, and for temperature. Using a meat thermometer, you want it to reach 170 degrees inside. If the meat has reached temperature but isn’t fork-tender yet, you can turn off the heat but return the dish to the still-warm oven for another half hour.
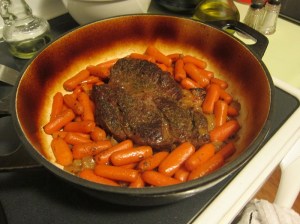
 To prepare the donut batter, whisk together the flour, sugar, baking powder, nutmeg, cinnamon, and salt in a large bowl, then create a well in the center of the mixture. Stir together the buttermilk, eggs, vanilla, and oil, then pour into the well in the dry mixture.
 Stir together until just combined, then transfer the mixture into a pastry bag, a gallon ziplock bag and then snip off the corner. I find this easiest to do by putting the ziplock in a flower vase with the top of the bag folded down over the edges to hold it up.
 Spoon a scant tablespoon of the topping into each well in the donut pan.
 Pipe the batter over the topping, to about 3/4 of the way full. (Mine are mostly a bit over-full.)
 I put one donut pan on a foil-lined baking sheet, and put that one on the bottom, and was glad I had done so, as a little bit of the cinnamon topping mixture leaked out the sides and was caught on the pan. Bake 10-12 minutes, or until the top springs back slightly when pressed.
 Let the donuts cool 5 minutes in the pan, then flip them out onto a wire wrack. Again, I recommend doing this over some foil, as some of the cinnamon topping may leak through the rack. If any of the topping remains in the donut pan, you can spoon it out and onto the donuts.
 If you only had one pan, repeat with the remaining cinnamon mixture and batter, re-greasing the pan in between.
 Give the glaze a little while to set up, and these are great to bring to a pot luck!